Configuring and Navigating Assessments with JAWS
Configure JAWS before students use it for computer-based testing. This section contains the instructions for the following tasks:
- Configuring JAWS to Recognize the Secure Browser
- Applying Settings for Contracted and Uncontracted Braille
- Configuring JAWS to Speak “Dollars”
- Optional JAWS Voice Adjustment Settings
Configuration
The configuration instructions in this subsection apply to JAWS 2023, JAWS 2024, and JAWS 2025, as well as Fusion.
Configuring JAWS to Recognize the Secure Browser
Take the following step to associate the current-year secure browser with JAWS:
- Open the JAWS ConfigNames.ini file. This file may appear in two folders. Depending on how JAWS is installed on the device, both files may need to be modified.
- Start ➔ All Programs ➔ JAWS [version year] ➔ Explore JAWS ➔ Explore Shared Settings (required)
- Start ➔ All Programs ➔ JAWS [version year] ➔ Explore JAWS ➔ Explore My Settings (optional)
- In the ConfigNames.ini file, locate the line of text that contains firefox:3=firefox. At the end of this line, press [Enter] on the keyboard to create a new line.
- In the new line, type in the following character string: CASecureBrowser18=firefox (no ending punctuation).
- Save the file. If it cannot be saved directly, save it to the Windows Desktop and then copy the ConfigNames.ini file to the location described in step 1.
- Take the following optional steps to verify proper configuration:
- Open the secure browser while JAWS is running.
- Hold down the [Insert] key or the JAWS key while pressing [Q] twice.
- Proper configuration is verified when a message opens in a pop-up window, indicating that secure browser settings are being used in the CASecureBrowser.exe application and that the configuration name is “CAI Testing.”
Applying Settings for Contracted or Uncontracted Braille
For students to use contracted or uncontracted literary braille with their RBD, the correct JAWS setting must be applied prior to launching the secure browser. Braille mode settings also need to be selected.
-
Open JAWS and then select the Utilities menu. In the Utilities menu, select Settings Center. The Settings Center, shown in figure 1, will open.
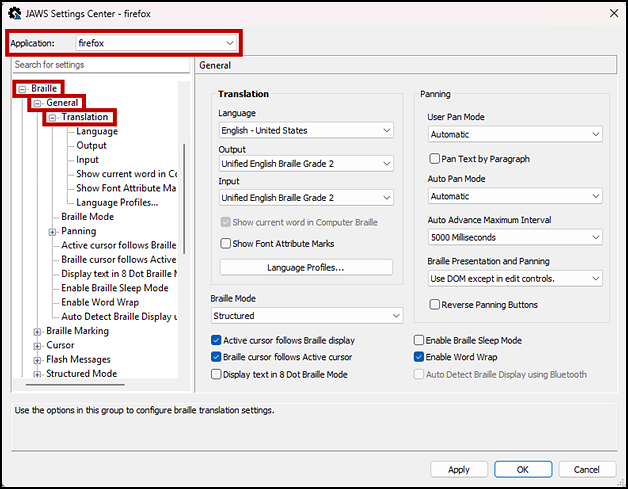
Figure 1. JAWS Settings Center, Contracted Braille Translation screen
- From the Application drop-down list at the top of the Settings Center screen, select Firefox (indicated in figure 1).
- Take the following actions; these options are also indicated in figure 1:
- Scroll down to the “Braille” section in the Search for settings panel displayed on the left side and expand the General and then Translation subsettings. The Settings Center window displays the options for braille translation.
- In the “Translation. section, verify the Language drop-down list is set to English – United States.
-
Select a braille type:
- For a student who prefers uncontracted braille, select Unified English Braille Grade 1 from the Output drop-down list.
- For a student who prefers contracted braille, select Unified English Braille Grade 2 from the Output and Input drop-down lists.
- In the Braille Mode section, ensure that the four settings that follow—and shown in figure 2—are checked (and only these settings are checked):
- Active cursor follows Braille display
- Braille display or cursor follows Active cursor
- Enable Word Wrap
- Auto Detect Braille Display using Bluetooth (if available)
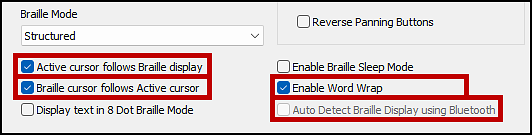
Figure 2. Braille Mode settings
- Select the [Apply] button and then select the [OK] button.
Setting the Placement of Status Cells
The instructions in this subsection will ensure that status cells are not shown on the RBD. Status cells are designated cells on an RDB designed to provide the user with information such as line number, column number, or the active JAWS screen reader cursor. Take these steps to set the placement of status cells to None:
-
Open JAWS and then select the Utilities menu. In the Utilities menu, select Settings Center. The Settings Center, shown in figure 3, will open.
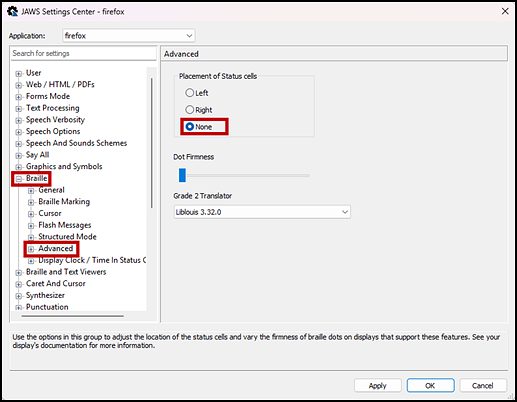
Figure 3. JAWS Settings Center, Advanced screen
- From the Application drop-down list at the top of the Settings Center screen, select Firefox (indicated in figure 3).
- Scroll down to the “Braille” section in the Search for settings panel displayed on the left side and select the Advanced subsetting.
- In the Placement of Status cells section of the Advanced panel on the right, make sure the None radio button is selected (also indicated in figure 3).
- Select the [Apply] button and then select the [OK] button.
Configuring JAWS to Speak “Dollars”
The instructions in this subsection will ensure that JAWS reads numbers preceded by a dollar symbol ($) using the dollars and cents format correctly if the dollar symbol appears in the test content.
- Open JAWS and then select the Utilities menu. In the Utilities menu, select Settings Center. The Settings Center will open.
- In the “Search for settings” panel on the left side, scroll down to the Text Processing section and expand the subsettings.
-
Select Number And Date Processing and then Speak Dollars from the Settings Center (figure 4).

Figure 4. Setting Center, Number And Date Processing options
- Check the box for Speak Dollars.
- Select [Apply] and then select [OK].
Optional JAWS Voice Adjustment Settings
JAWS voice settings may be adjusted for a student on the basis of the student’s individual needs. Voice Profile, Speaking Rate, and Punctuation must be set prior to administering assessments. Instructions for each setting follow.
Opening the JAWS Voice Adjustment Window
Open JAWS and select the Options menu. In the Options menu, select Voices and then Voice Adjustment, which is shown in figure 5. The Voice Adjustment interface will open. When all settings are saved, select [OK].
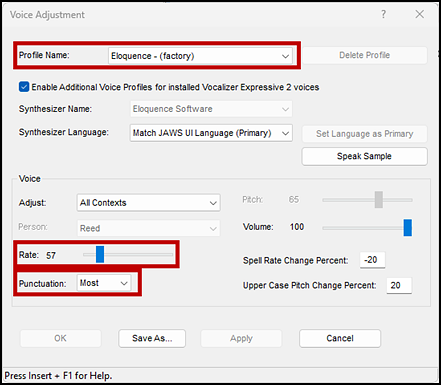
Figure 5. Opening the Voice Adjustment interface
Voice Profile
- Select a Voice Profile from the Profile Name drop-down list (indicated in figure 5).
- Select the [Apply] button.
Voice Rate
- In the “Voice” section, drag the slider to the desired rate of speed (indicated in figure 5). The lower the rate, the slower the words will be read aloud.
- Select [Apply].
Punctuation
- In the “Voice” section, select the Punctuation drop-down list (also indicated in figure 5). Select from the following options: None, Some, Most, and All.
- Select [Apply].
Navigation
This subsection provides an overview of how students can navigate through the assessment and test questions using JAWS commands.
As TAs and TEs work with students to familiarize them with using the TDS, they should make students aware that the braille transcriptions may not follow the usual braille rules. TAs, TEs, and students should review the information in this subsection prior to taking a practice or training test or operational assessment.
Navigating Sign-In
This subsection provides instructions about how students navigate the sign-in pages of the TDS. A student will take the following actions to navigate the Student Sign-In screen:
- To listen to each line of text, the student presses the [Down] arrow key.
- To move to the [Return to Login] and [Begin Test Now] buttons, the student presses the [Tab] key until the necessary button is reached.
- To select the [Return to Login] or [Begin Test Now] button, the student presses [Enter].
Sign In to the Operational Assessment
Step 1. Please Sign In Screen
- The student opens JAWS on the local device.
-
To access an operational assessment, the student opens the secure browser on the local device. The student Please Sign In screen, shown in figure 6, displays.
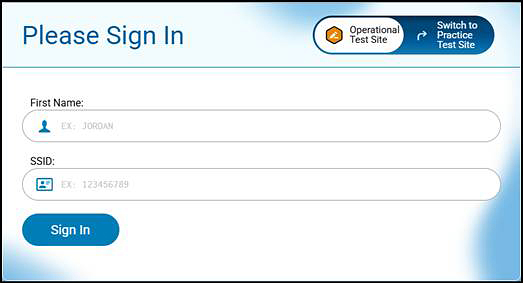
Figure 6. Student Please Sign In screen
- On the Please Sign In screen, the student must enter their first name and SSID, and then select the [Sign In] button.
- The student presses the [Tab] key to navigate to the First Name field, where the student should enter a first name. (The student may need to press [space bar] before typing.)
- The student presses the [Tab] key to navigate to the Student ID field, where the student should enter an SSID.
- The student presses the [Tab] key to navigate to the [Sign In] button and then presses the [Enter] key to log on.
Step 2. Is This You? Screen
This screen requires students to verify personal information.
- On the Is This You? screen (shown in figure 7), the student must verify personal information. If the information is correct, the student should select [Yes].
- To listen to each line of text, the student presses the [Down] arrow key. The listed demographic information will be read aloud.
- To move to the [Yes] and [No] buttons, the student presses the [Tab] key.
- To select the [Yes] or [No] button, the student presses [Enter].
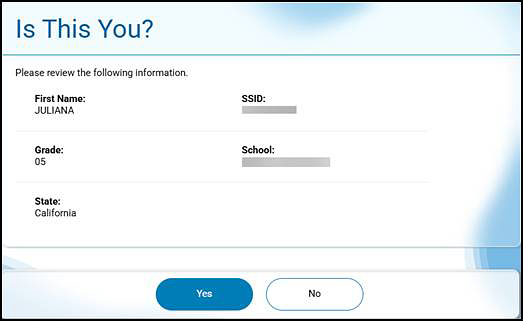
Figure 7. Is This You? Student verification screen
Step 3. Session ID Screen
This screen requires students to enter the session ID provided by the TA or TE.
- On the Login Session screen (figure 8), the student enters the session ID and then selects the [Join Session] button. The session ID for an operational session always starts with “CA,” which is already present.
- The student presses the [Tab] key to navigate to the text box for the session ID and then enters the text given by the TA or TE.
- The student presses the [Tab] key to navigate to the [Join Session] button and then presses the [Enter] key to move on with the logon process.
- To return to the Is This You? screen, the student presses the [Tab] key twice to navigate to the [Back] button and then presses the [Enter] key.

Figure 8. Session ID field on the Login Session screen
Step 4. Your Tests Screen
This screen lists the available tests for the student’s grade level for the test session (figure 9).
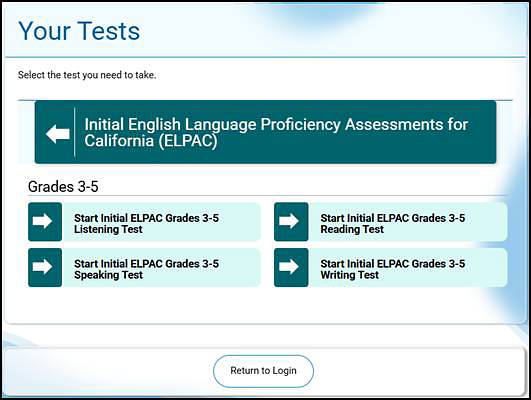
Figure 9. Sample Your Tests screen
- To move to the first test listed on this screen, the student presses the [Tab] key.
- To navigate between the test names, the student presses the [Tab] key. For two-column presentations, the order of navigation is from left to right and top to bottom, in a zigzag pattern.
- To start or resume the assessment in focus, the student presses the [Enter] key.
Step 5. Sound and Video Playback Check
The student should verify the audio works on the Audio/Video Checks screen by pressing the [Enter] key to play the video and listen to the audio after JAWS reads “play video button” (figure 10). After verifying the video plays and hearing the sample audio, the student presses the [Tab] key to navigate to the [I could play the sound and video] button and then presses [Enter] or [space bar] to select this button.
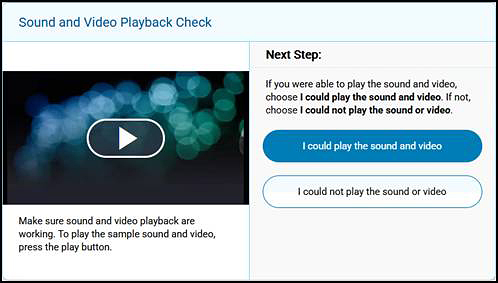
Figure 10. Sound and Video Playback Checks screen
Step 6. Instructions and Help Screens and the Review Test Settings Pages
The Instructions and Help screen allows access to the student Help Guide and the Test Settings page. Students can access the Review Test Settings page to verify that all test information and settings are correct. Settings may be different for different assessments.
-
After the student has been approved for starting an operational assessment, the Instructions and Help screen, shown in figure 11, appears. The student has the option of continuing to the assessment, reviewing test settings, or reviewing the on-screen help.
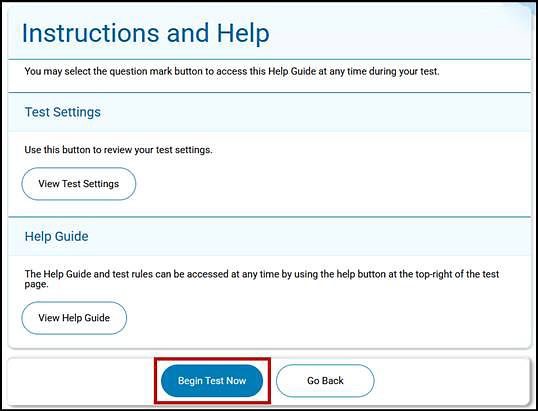
Figure 11. Instructions and Help screen
- The student should take the following steps to navigate the Instructions and Help screen. At any time, the student may [Tab] to the [Begin Test Now] button—indicated in figure 11—and press [Enter] to begin testing.
- To listen to each line of text, the student presses the [Down] arrow key.
- To move to the [Return to Login] and [Begin Test now] buttons, the student presses the [Tab] key.
- To select the [Return to Login] or [Begin Test Now] button, the student presses [Enter].
-
The student can opt to again verify that all test information is correct by selecting the [View Test Settings] button and reviewing the settings on the screen, displayed in figure 12.
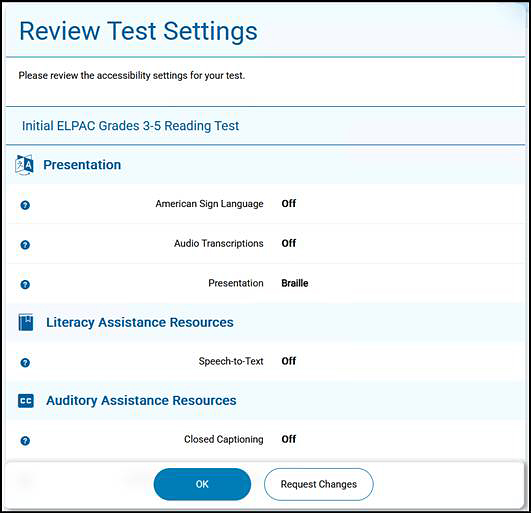
Figure 12. Review Test Settings screen
- To listen to each line of text, the student presses the [Down] arrow key.
- The student presses [Enter] to select the [Select] button and confirm the settings.
- If the information is not correct for an operational assessment, the student should navigate to the [Return to Login] button (not shown) and press [Enter], and then communicate the incorrect information to the TA or TE. If this is a practice or training test, the student can toggle a setting by selecting it and then pressing [space bar].
-
The student can select the [View Help Guide] button for additional information about the assessments, either CAASPP or ELPAC, by pressing the [Tab] key to navigate to the [View Help Guide] button and then pressing [Enter]. The Help Guide screen, like the one shown in figure 13, appears.
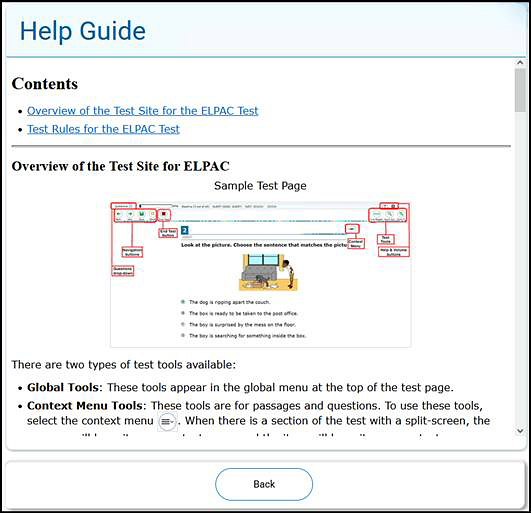
Figure 13. Sample Help Guide screen for ELPAC
- The student presses [Tab] to navigate to the [Back] button and then presses [Enter] to return to the Instructions and Help screen.
- To proceed and start the assessments, the student should navigate to [Begin Test Now] and then press the [Enter] key.
Access the Practice Tests and Training Tests
A student can become familiar with the TDS and any assigned accessibility resources by taking a practice test or training test.
-
To access a practice test as a guest, a student accesses the CAASPP & ELPAC Website and selects the [Practice and Training Tests] button (figure 14) to open the Practice and Training Tests web page.
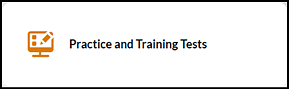
Figure 14. [Practice and Training Tests] button on the CAASPP & ELPAC Website
-
The student selects the [Student Access to Tests] button in the “Practice and Training Tests for Students” section (figure 15) on the Practice and Training Tests web page.
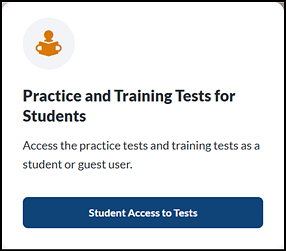
Figure 15. [Student Access to Tests] button on the Practice and Training Tests web page
-
Selecting the button in figure 15 opens the Please Sign In screen for the Practice and Training Test Site (figure 16).
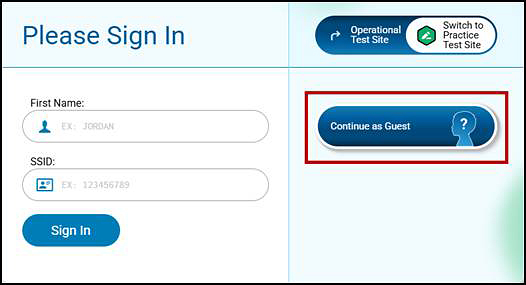
Figure 16. Please Sign In screen for the Practice and Training Tests Site
- To open a practice test or training test as a guest user:
- The student selects the [Continue as Guest] button on both the Please Sign In and Login Session screens—guest users will not receive an Is This You? screen.
- The student selects a grade from the Grade list on the Your Tests screen.
-
This screen then lists the available tests for the student’s grade level (figure 17). The student selects a test category button, such as [Smarter Balanced Practice Tests] (indicated in figure 17).
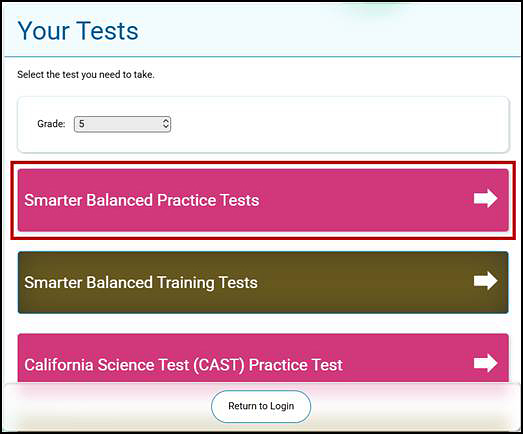
Figure 17. Your Tests screen for a guest user
- The student selects the test name. Most practice tests and training tests for CAASPP are listed in a single column. For the CAA practice tests; CSA practice tests; and ELPAC practice tests and training tests, these are listed in two columns. Students will hear the test name, then the opportunity number, and then the link to choose that test.
- To open a practice test or training test as a student who is joining a proctored session:
- The student enters their first name and SSID, and then selects the [Sign In] button.
- The student must verify their personal information on the Is This You? screen. If the screen is correct, the student selects [Yes].
- The student enters the session ID provided by the TA or TE. The session ID for an operational session always starts with “TRAIN,” which is already present.
- The student selects a test category button, such as [Smarter Balanced Practice Tests] (indicated in figure 18).
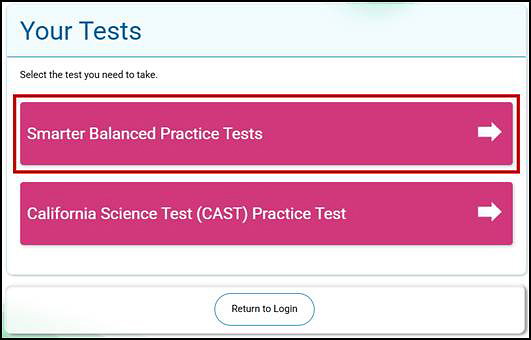
Figure 18. Your Tests screen for a proctored session
- The student selects the test name. Most practice tests and training tests for CAASPP are listed in a single column. For the CAA practice tests; CSA practice tests; and ELPAC practice tests and training tests, these are listed in two columns. Students will hear the test name, then the opportunity number, and then the link to choose that test.
When selected, the options for that practice test or training test open.
A student in a proctored session will move first to the Sound and Video Playback Check screen, and then they can review their test settings. Test settings for a student in a proctored session were either set in TOMS for the program or set by the TA or TE in the Test Administrator Interface. This opens the Review Test Settings screen (figure 12), which is opened by selecting the [View Test Settings] button on the Instructions and Help screen). Finally, the practice test or training test opens when the student selects the [Begin Test Now] button on the Instructions and Help screen.
A student in a guest session can change their test settings using the Choose Settings screen (figure 19). It is closed by selecting the [Select] button at the bottom of the screen. Then, the student will move through the Sound and Video Playback Check screen and return to the Instructions and Help screen; the practice test or training test opens when the student selects the [Begin Test Now] button on the Instructions and Help screen.
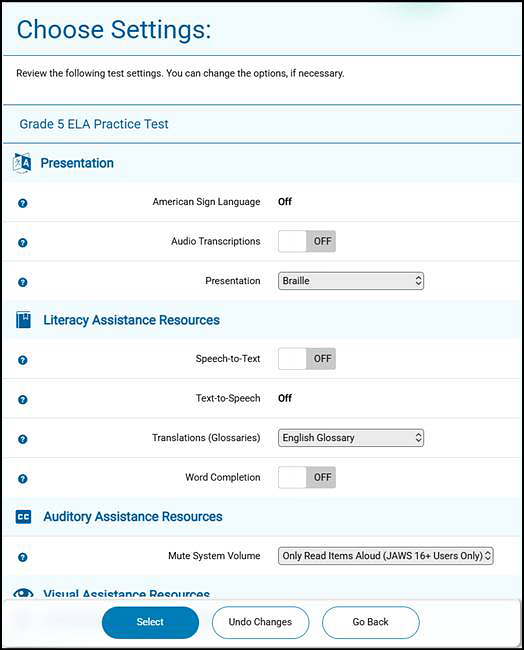
Figure 19. Choose Test Settings screen
Navigating Within the Assessment
This subsection provides instructions that describe how students can move around on a test page.
About Test Elements
A test page has up to three primary landmark elements: the Banner Region (test and student information) ; Navigation and Test Tools Region; and Test Content Region, where the primary test content is located (shown in figure 20). Students navigate between these landmarks in JAWS by pressing the [R] key.
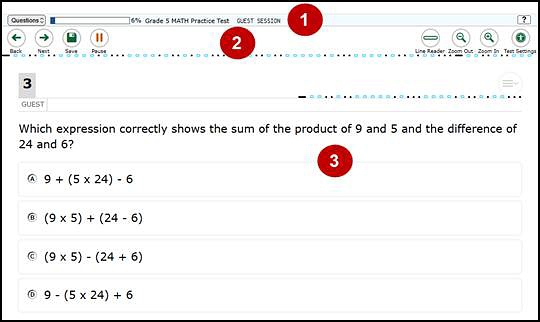
Figure 20. Example test page in streamlined mode
- Banner Region: The banner contains the test information row, which displays the current question number(s), student’s progress, test name, student name, and help button.
- Navigation and Test Tools Region: This region, arrayed horizontally across the screen, displays the navigation and tool buttons.
- Test Content Region: This section contains the test content, which has the following parts:
- Stimulus: The “Stimulus” region contains the following elements:
- Stimulus title
- Stimulus context menu
- Stimulus content
- Question: Each question in the “Question” region contains the following elements:
- Question number
- Question labels
- Question context menu
- Question stem
- Response area or answer options
- Stimulus: The “Stimulus” region contains the following elements:
JAWS Keyboard Commands
A student uses the keyboard commands in table 1 through table 4 to navigate within a test page. A student using RBDs with router keys may also press the router key above the text for a button to move the cursor to that button. The student can press the router key again to select that button instead of using the provided keyboard commands.
The actions associated with each JAWS keyboard command depend on the context in which the student presses the key—the same key may have different effects depending on whether the student is on the sign-in pages, the test pages, or within the items and stimuli of the test pages.
A student uses Forms Mode to navigate within an element, such as a listbox, which allows multiselection of options in the list. Forms Mode should either be activated automatically when focus is brought to that element using [Tab] or by pressing [Enter] on the element. The arrow keys should then be used. To exit Forms Mode, a student must press Num Pad [+] (the plus key on the keyboard numbers pad) or [Esc]. This allows a page’s content, including plain text such as test questions, to be read in detail.
About JAWS Keyboard Commands: The commands in table 1 through table 4 are a subset of all available JAWS commands. For students to use these keyboard commands, permissive mode must be enabled in the TDS and JAWS must not be in Forms Mode.
Navigating Sign-In Pages with JAWS Keyboard Commands
| Action | Keyboard Command |
|---|---|
|
Returns the focus to the secure browser if the student navigates to the JAWS application window while signing in (Keyboard layouts may vary by device. Please refer to the manual provided by the device manufacturer for more information.) |
[JAWS modifier key] + [F10] (standard keyboard) |
|
Returns the focus to the secure browser if the student navigates to the JAWS application window while signing in (Keyboard layouts may vary by device. Please refer to the manual provided by the device manufacturer for more information.) |
[Space bar] + [S] (Perkins braille keyboard) |
|
Moves the focus to the next field or button on the page |
[Tab] |
|
Moves the focus to the previous field or button on the page |
[Shift] + [Tab] |
|
Reads the next line on the page |
[Down] Arrow |
|
Reads the previous line on the page |
[Up] Arrow |
|
Selects the button, link, or control that is currently in focus |
[Enter] |
Navigating Test Pages with JAWS Keyboard Commands
| Action | Keyboard Command |
|---|---|
|
Navigates to the next landmark element on the page; a test page has up to three primary landmark regions:
|
[R] |
|
Jumps to the next heading on the page; in general, the following test components are defined with a heading:
On test pages that have multiple questions, a student can jump directly from one question to the next. To do so, the student should press the [H] key and then press the [Down] arrow twice. The question prompt will then be read aloud. |
[H] |
|
Jumps to the previous region on the page |
[Shift] + [R] |
|
Jumps to the previous heading on the page |
[Shift] + [H] |
|
Moves to the next component on the page; in general, the following test elements are components:
|
[Tab] |
|
Moves to the previous component on the page |
[Shift] + [Tab] |
|
Selects a button or response option or opens a context menu |
[Enter] |
|
Moves to the next line on the page |
[Down] Arrow |
|
Moves to the previous line on the page |
[Up] Arrow |
|
Reads everything on the page (from the current point of focus) |
[JAWS modifier key] + [Down] Arrow |
|
Stops JAWS from reading |
[Ctrl] |
Opening and Using Context Menus with JAWS Keyboard Commands
| Action | Keyboard Command |
|---|---|
|
Opens the context menu when JAWS reads “menu button” (This is the only way to open the context menu when streamlined mode is turned on.) |
[Enter] |
|
Moves the focus to the next option in the menu, which JAWS will read aloud |
[Down] Arrow |
|
Moves the focus to the previous option in the menu, which JAWS will read aloud |
[Up] Arrow |
|
Selects the menu option currently in focus |
[Space bar] |
|
Closes the context menu without selecting any option |
[Esc] |
Responding to Items with JAWS Keyboard Commands
| Action | Keyboard Command |
|---|---|
|
[Tab] |
|
Navigates to the previous answer option, text box, selectable text field, keypad button, or checkbox, depending on the item type |
[Shift] + [Tab] |
|
[Up] and [Down] Arrows |
|
[Space bar] |
|
[Enter] |
|
Opens a pop-up menu with special characters for equation items (A student can use the arrow keys to move between the special characters in the list and then press [Enter] to insert a special character in the response area.) |
[Alt] + [7] |
Using the Braille Viewer with JAWS
The Braille Viewer is a tool used to visually display the on-screen text of exactly what is being presented on a braille display. It is useful for those who cannot read braille or have limited or no access to an actual braille device. The Viewer can be opened at the top and bottom of the screen.
Context Menus
The first question or element on a test page will automatically be selected (that is, “in focus”). Any action taken with a keyboard, mouse, or adaptive peripheral device on a selected element will cause a reaction in that element. Pressing the [Tab] key moves through the elements on a page. For example, pressing [space bar] while navigating the page from which figure 21 was excerpted in a practice test (guest session) would cause the toggle next to Permissive Mode to reset to “ON” (from its present position of “OFF”).
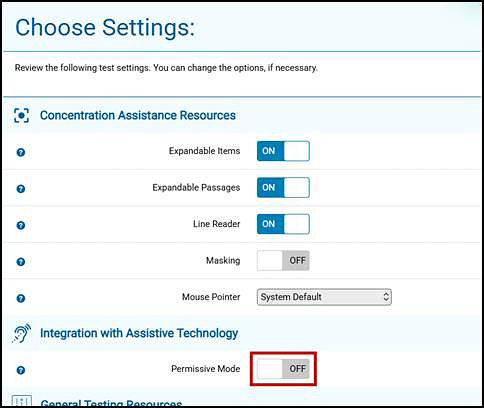
Figure 21. Page excerpt showing an element in focus
A border with a solid or dotted line, a highlight, and a blinking cursor are common, visual indications that an element is in focus.
The instructions in this subsection assume the student wants to open the context menu for the active (in focus) landmark element on the page and has not yet used the [Tab] key to navigate anywhere.
- The student should ensure the focus is on the element—stimulus or question—for which the context menu is being opened.
- To navigate directly to the context menu button, the student presses the [Tab] key twice to display the context menu button. JAWS will read the context menu as “Menu button.”
-
The student presses the [Enter] key to open the context menu and display the list of available menu options, as shown in figure 22. JAWS will read aloud the first item in the menu (for example, “Item Tutorials”).
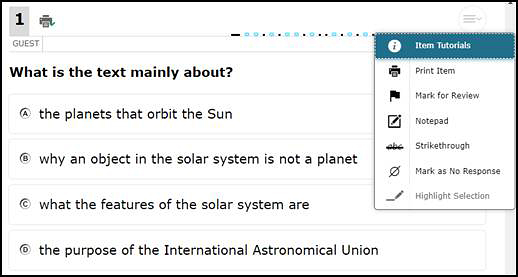
Figure 22. Context menu for a question
- To move up and down the list, the student presses the [Up] and [Down] arrow keys. JAWS will automatically read aloud each question.
- To select a menu option, the student presses [space bar]. To exit the menu without making a selection, the student presses the [Esc] key. JAWS will return the focus to the context menu button.
Question Labels
After a student uses a context menu tool for a given question, a label for that tool appears next to the question number (also presented in figure 23). When the student navigates to a question with labels, the student can press [Tab] to navigate to each label, which JAWS reads aloud.
- When a question is marked for review, JAWS reads “Marked for review” for the question label, which is the [Marked for review] (flag-check) [
 ] icon.
 - When a question has been printed (embossed), JAWS reads “Printed” for the question label, which is the [Print] (printer-check) [
 ] icon.
 - When the student has entered a note for a question, JAWS reads “Notes” for the question label, which is the [Notes] (notepad-check) [
 ] icon.
CSA Using a Screen Reader
Nonvisual Information
Be advised that the CSA contains several instances where information not seen by sighted test takers is available to those using a screen reader. If a screen reader user leverages line-by-line navigation, JAWS will introduce the nonvisual information by voicing the word, “gráfico.” In these instances, students should be aware that a graphic is not actually present.
The following are scenarios in which this announcement will occur:
- Drama passages, to make a distinction between dialogue and stage directions
- Footnotes, when a definition of a footnote is introduced within a passage
- Blank spaces, in instances where underlining has been tagged as “blank space”
- Abbreviations and Roman numerals, in cases where pronunciation had to be controlled to ensure clarity of the content
Screen Readers and Refreshable Braille
Screen reader software may be used with refreshable braille and audio presentation.
Text to Be Revised
On specific multiple-choice questions, the student may be asked about a portion of the text that may need to be revised. For these questions, the student will be presented with four answer choices, each with different versions of the written text. Each answer choice will be followed by a repetition of the answer choice in context of the original excerpt. The answer choices in context are preceded by introductory statements such as, “La oración con cambio, lee:” or “La definición lee:”. In some instances, the student may want to navigate word-by-word or character-by-character to discern any grammatical or punctuation errors, in addition to addressing any words that may not be pronounced clearly by an assistive technology. Additional information about this portion of the assessment is included in the test directions.
Responding to Toggle Questions
This subsection provides basic guidance for responding to question types that may appear on practice or training tests and operational assessments.
Multiple-Choice Questions
Multiple-choice questions require the student to select one answer option. The response area will display several multiple-choice options as radio buttons. The student must select a radio button.
- After listening to the question text, the student presses the [Down] arrow key or the student presses the [Tab] key.
-
JAWS will read aloud the option letter and option text that is in focus; a sample containing practice test questions is shown in figure 23. If the option is an image, JAWS will read the text description associated with the image.
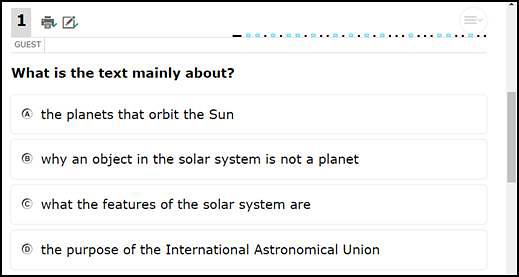
Figure 23. Selecting a radio button answer option
- To navigate between each answer option, the student uses either the [Tab] and [Shift] + [Tab] commands or the [Up] and [Down] arrow keys to move between options. Note that tabbing may cause the focus to navigate through selectable features and miss important information.
- JAWS will read aloud the text for the option in focus.
- To select an answer option in focus as the response, the student presses [space bar]. The answer option is selected, and JAWS reads “Space,” rereads the response text, and then reads “Selected” to confirm that the response choice is the one the student has selected. If the student selects an option that has been stricken using the strikethrough tool, JAWS will read “Option is struck through.”
Hot Text
Hot text questions require the student to select at least one word, phrase, or sentence. For these question types, it is critical to follow the instructions provided in the question. Some questions may tell the student to select two responses. Others may tell the student to select one response.
- After listening to the question text, the student presses the [Tab] key twice or presses the [Down] arrow key.
-
JAWS will read aloud the text that is in focus; in figure 24, this text is, “’There is a wonderful power in steam,’ he said to himself.”
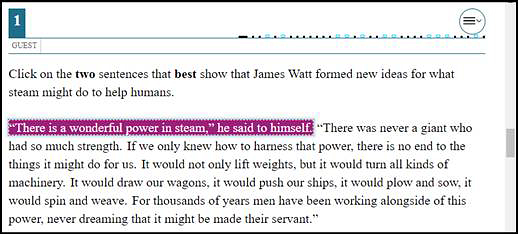
Figure 24. Selecting hot text
- To navigate between each selectable text area, the student uses the [Down] arrow command.
- JAWS will read aloud the selectable text.
- To choose a selectable text area in focus as the response, the student presses the [Enter] key. JAWS will announce the text is selected.
Edit Task
Edit task questions require the student to select a response from a list, as shown in figure 25. For these question types, it is critical to follow the instructions provided in the question.
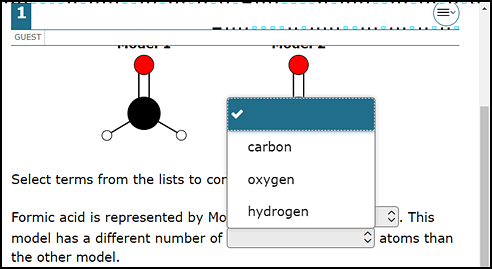
Figure 25. Edit task: list options
Notes about JAWS and Edit Task Questions:
Each selectable text area is predefined. For selectable text, JAWS will indicate whether the word or phrase is selectable and then continue reading the rest of the sentence or line.
- The student uses the [Down] arrow key to read through each line of text.
- If a line of text has a selectable word or phrase, JAWS will say “clickable” after the word or phrase.
-
The student navigates to each selectable text field in the question.
Option 1: The student returns to the beginning of the question.
- Press [Shift] + [H].
- Press the [Tab] key to go to the first selectable text field.
Option 2: The student moves backward through the selectable text fields in the question.
- Press [Shift] + [Tab].
-
When the selectable text is in focus, the student presses [space bar]. This will open the edit menu. JAWS will read “Edit tools dialog” aloud and provide additional instructions.
Drop-down list: The student uses the [Up] and [Down] arrow keys to move between options in the list. JAWS will read each option aloud. To select an option, the student presses [Enter].
- The student presses the [Tab] key or [Up] or [Down] arrow key to navigate to the [OK] button in the edit menu and then presses [Enter]. The edit menu will close, and the question will be back in focus.
Text Response with Text Formatting Row
Text-response questions require the student to enter text into a text box. The student may be asked to write a sentence, paragraph, or essay. These questions include a row of buttons representing options for formatting text, which is indicated in figure 26. Formatting options include bold, underline, italics, numbered bulleting, symbol bulleting, and more; a list of keyboard shortcuts is available after selecting the [Accessibility Help] universal access [ ] icon, which is the first formatting icon on the toolbar.
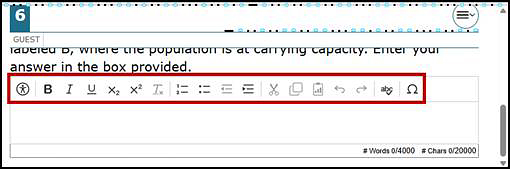
Figure 26. Answering a text-response question with text formatting
- The student reads the question and then tabs to move to the response. JAWS will beep and then read, “Edit, type in text” aloud. If JAWS does not beep, the student should press the [space bar].
- The student enters a response into the text box.
- When the student is finished entering a response, the student presses the [Esc] key and then the [Tab] key to exit the response area.
- The student will leave the text box and move to the next question or field on the page. JAWS beeps again in a different tone upon leaving the text box.
Equation
Equation questions, such as the one shown in figure 27, require a student to enter a mathematics equation or expression in a text field using an on-screen keypad.
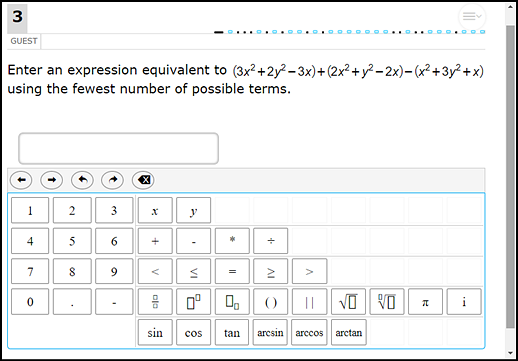
Figure 27. Equation question
- To navigate between the keypad buttons, the student presses the [Tab] key or [Shift] + [Tab]. JAWS reads aloud the character or action for each button.
- To enter a character in the text field or perform an action from the keypad toolbar, the student presses the [Enter] key. The student can also press the corresponding key on the keyboard, if available.
- Optional: To add special characters to the text field, the student presses [Alt] + [7] with the focus on the text field. A pop-up window opens with a drop-down list of the available characters. To move between the options in this list, the student uses the arrow keys. JAWS reads the name of each special character. To insert the selected character, the student presses the [Enter] key.
Table Match
Table-match questions, like the sample question in figure 28, require a student to mark at least one checkbox in a table. The table will have multiple rows and columns. The table row heading and column heading are not selectable. The selectable table cells have checkboxes.
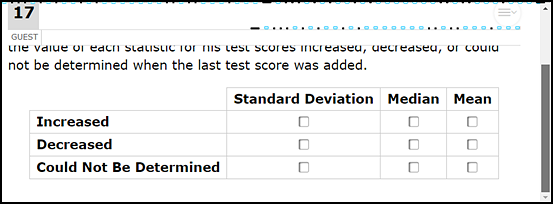
Figure 28. Responding to a table-match question
- After listening to the question text, the student uses the down arrow to hear features of the table (such as, how many columns and rows) and then the options.
- The student presses the [Tab] key twice or presses the [Down] arrow key to take the student to the first table cell that has a checkbox; and then uses the [Down] arrow key to hear everything in the table.
- JAWS will read aloud the corresponding column name and row name for that table cell.
- To navigate to each cell that has a checkbox, the student presses the [Tab] key or the [Down] arrow key.
- JAWS will read aloud the corresponding column and row name for each cell.
- To mark a checkbox, the student presses the [space bar].