Software Configuration
This section describes how to configure the operating systems and web browsers that support the operations necessary for the computer-based, in-person testing administered via the secure browser. Note that software configuration requirements support a secure, online testing environment.
For students to access computer-based tests, each student testing device needs CAI’s secure browser installed on it. The secure browser is CAI’s customized web browser designed to keep tests secure by locking down the student desktop and preventing the student from accessing anything except the test. Unlike conventional web browsers, the secure browser displays the student application in full-screen mode with no user interface to the browser itself. It has no back button, next button, refresh button, URL bar, or any other means to navigate the internet. Students open the secure browser and are taken directly to the necessary screen.
Optimal Installation Scenario for Secure Browsers
The Secure Browser subsection for each operating system section in Operating System Configuration describes several scenarios for installing the secure browser. However, the secure browser must be installed locally on each student’s testing device rather than on a shared network drive from which students would run the secure browser, as this will compromise the stability and performance of the secure browser, especially during peak testing times. Running the secure browser on a shared network drive creates competition among the students’ clients for two resources: LAN bandwidth and shared disk drive input and output. This performance impact can be avoided by installing the secure browser locally on each device. Additionally, running the secure browser from a shared location also creates security risks.
Configuring Commercially Available Web Browsers
This subsection describes how to configure commercially available browsers (Chrome, Safari, Firefox, Edge) that support the operations necessary for student online testing.
Preventing Auto Update on Device Operating Systems Used for Test Operations
It is recommended that all application and operating system software on all devices used for test operations and student testing (in conjunction with the secure browser) be configured to turn auto update features off during testing hours. Refer to the software’s documentation or Help feature to determine whether the software uses auto update and to access instructions on disabling this feature for the duration of the LEA’s or test site’s selected scheduled testing days or time frames.
Keyboard Navigation on the Tool Menu Using a Safari Browser
Unlike other browsers, students cannot use Safari to navigate to the Tool menu using standard methods on practice and training tests. To enable access to the Tool menu using Safari, check the Press Tab to highlight each item on a webpage box in the “Accessibility” section of the Safari Advanced preferences, as shown in figure 1.
- Open Safari.
- Select Settings from the Safari menu.
-
Select the [Advanced] button to open the Advanced window (figure 1).
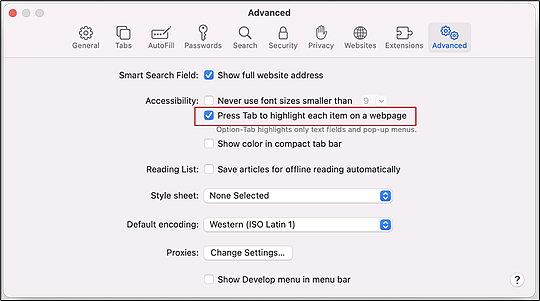
Figure 1. Safari Advanced settings
- Check the Press Tab to highlight each item on a webpage box to enable keyboard use on the Tool menu in practice tests.
Configuring Network Settings for Online Testing with the Secure Browser
LAN settings on testing devices should be set to automatically detect network settings.
Windows Devices
To set LAN settings to auto detect on Windows devices:
- Access “Internet Options.” One way to do this is to navigate to Control Panel ➔ Network and Internet ➔ Internet Options. Another way is to type Internet Options in the Search field on the Windows taskbar.
- In the Internet Properties dialog box, select the [Connections] tab.
- Select the [LAN settings] button.
- Check the Automatically detect settings box.
- Select [OK] to close the LAN Settings dialog box.
- Select [OK] to close the Internet Properties dialog box.
- Close the Control Panel.
macOS Devices
To set LAN settings to auto detect on macOS devices:
- Choose the Apple menu ➔ System Settings.
- Select [Network].
- Select [Ethernet] for wired connections or [Wi-Fi] for wireless connections.
- Select [Advanced].
- Select the [Proxies] tab.
- Toggle Auto Proxy Discovery to “On.”
- Select [OK] to close the dialog box.
- Select [Apply] to close the Network dialog box.
- Close System Preferences.
Linux Devices
To set LAN settings to auto detect on Linux devices:
- Open System Settings.
- Open [Network].
- Select Network Proxy.
- From the Method drop-down list, select None.
- Select [.] to close the Network dialog box.
Installing ChromeOS Flex on PCs and Macs
ChromeOS Flex—formerly CloudReady—is a reduced-feature operating system, built on the same technology as ChromeOS, that runs on devices with limited resources. If the school or LEA has older devices that do not run newer versions of Windows or macOS, consider installing ChromeOS Flex on those devices. This installation can postpone or prevent a costly hardware upgrade. As with ChromeOS, Google Management licenses are also required for ChromeOS Flex devices.
Refer to the ChromeOS Flex web page for information about ChromeOS Flex and installation instructions.
Configurations for Testing Students Using Accessibility Resources
For information about configuring operating systems and software for testing with accessibility resources, including braille, TTS and the NeoSpeech voice pack, STT, and permissive mode, refer to the Configuring Selected System and Third-Party Accessibility Resources chapter of the Accessibility Guide.