Features of the Student Testing Application
This section describes the layout of the student testing application and the available testing tools. Note that tools and features vary depending on the assessment being taken; not all tools are available for all assessments.
Test Layout
Figure 1 shows the main sections of the layout for a test page that includes a stimulus.
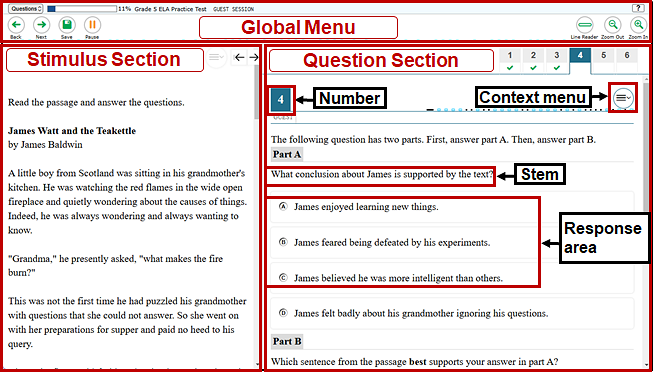
Figure 1. Sample test layout
A test page can include the following sections:
- The Global Menu section displays the global navigation and tool buttons. The banner above the Global Menu displays the Questions drop-down list, test information, [Help] question mark [?] button, and [Test Settings] universal access [
 ] icon (if present).
 - The Stimulus section appears only for questions associated with a stimulus. A stimulus is a reading passage or other testing material (such as a video or graphic) that a student reviews to answer associated questions. This section contains the stimulus content (such as a reading passage or graphic), context menu, and Expand Passage tool.
- The Question section contains one or more test questions (also known as “items”). Each question includes a number, context menu, stem, and response area.
For more information about the global menu and context menus, refer to the subsection Using Menus and Selected Tools.
Test Tools
This section provides an overview of the TDS’ available tools.
Figure 2 shows the location of primary features and tools available in the TDS.
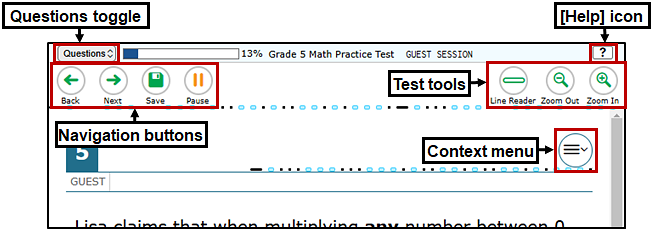
Figure 2. Test page
Table 1 lists the global tools available to students in the testing application.
| Global Tool | Instructions |
|---|---|
|
Calculator
|
To use the on-screen calculator, the student selects the [Calculator] [ |
|
Dictionary
|
To look up definitions and synonyms in the Merriam-Webster dictionary or thesaurus, the student selects the [Dictionary] open book [ |
|
Formula
|
To view the on-screen formula (also called science reference) sheet, the student selects the [Formula] xy2 [ |
|
Help
|
To view the on-screen Help Guide window, the student selects the [Help] question mark [ |
|
Line Reader
|
The student moves an on-screen horizontal line that surrounds each line of text with shading after selecting the [Line Reader] line [ |
|
Masking
|
The student takes the following steps to temporarily cover a distracting area of the test page:
|
|
Notes
|
To enter notes in the on-screen notepad, the student selects the [Notes] paper and pencil [ |
|
Pause
|
To pause an assessment, select the [Pause] parallel lines [ |
|
Periodic Table
|
To view the on-screen periodic table, the student selects the [Periodic Table] [ |
|
Print Page
|
To print content when print-on-demand has been enabled, the student selects the [Print Page] printer [ |
|
Test Settings
|
To adjust audio volume, rate, pitch and tracking for assigned text-to-speech; assigned mouse pointer settings; or color contrast during the assessment, the student selects the [Test Settings] universal access [ |
|
Transcripts
|
To view a transcript of the audio content for the current test page, the student selects the [Transcripts] [ |
|
Zoom buttons
|
To enlarge the text and images on a test page, the student selects the [Zoom In] magnifying glass (plus) [ |

 ] icon.
 ] icon.
 ] icon in the global menu.

 ] icon. This tool is not available while the Highlighter tool is in use.
 ] icon.
 ] icon. These notes are available globally and can be accessed from any page in the assessment.
 ] icon. Pausing logs the student off the assessment.
 ] icon in the global menu.
 ] icon.
 ] icon in the upper-right corner. (Note that a student testing on a tablet likely cannot use this tool to adjust volume. To adjust audio volume on a tablet, the student can use the device’s built-in volume control instead.)
 ] icon in the global menu. The text in transcripts can be read by a screen reader.

 ] icon. The student can zoom in up to four levels. To undo zooming, the student selects the [Zoom Out] magnifying glass (minus) [
 ] icon.
Table 2 lists the other tools available to students in the testing application.
| Context Menu Tool | Instructions |
|---|---|
|
American Sign Language (ASL) |
To view audio content translated into ASL via an on-screen video, the student selects the [American Sign Language] hands [ If multiple ASL videos are available, [American Sign Language] icons appear next to the test content for each video. The student may select the icon for the test content to translate into ASL. |
|
Closed-captioning |
Questions and stimuli with audio elements automatically display closed-captions for a student testing with the appropriate accommodations. Selecting an [Up] up arrow [ |
|
Expand item and passage |
Test questions (items) in the right pane of the testing screen can be expanded to cover the width of the whole screen. When used in conjunction with the expand passage universal tool—that is, expand passage is not turned off by the TA—the student can use this tool to expand either passages or questions. (This tool is the default expansion tool in the CAAs for ELA and mathematics.)
|
|
Expandable passages |
When the expand item universal tool has been turned off by the TA or TE, the student uses the arrows [ |
|
Glossary (word list) |
To open the glossary, the student selects a word or phrase that has a border around it. If translated glossary resources are being used (mathematics and science only), the student has the option of hearing the glossary item read aloud by selecting the [Speaker] [ |
|
Highlighter |
To highlight text, the student selects the text on the screen and then selects a color from the context menu, in the “Highlight Selection” section. To remove highlighting, the student selects Reset Highlighting from the context menu. Text in images cannot be highlighted. This tool is not available while the line reader tool is in use. Highlighting persists only during a single test session. |
|
Mark for review |
To mark a question for review, the student selects Mark for Review from the context menu. The question number displays a flap in the upper-right corner, like this: |
|
Notepad |
To enter notes for a question, the student selects Notepad from the context menu. After the student enters a note, the [Notepad] note [ The student can access notes only for a question on that question’s test page. |
|
Print (item or passage) |
To send a print request for an individual passage question, the student selects Print Passage or Print Item from the context menu. After sending the request, the [Printer] [ |
|
Strikethrough |
For selected-response questions, the student can cross out an answer option to focus on the options the student thinks might be correct. There are two options for using this tool:
To deactivate Strikethrough mode, the student presses the [Esc] key, selects outside the question’s response area, or right-clicks an answer option and selects Undo Strikethrough. |
|
Speech-to-text |
The student selects the [Microphone] [ |
|
Text-to-speech |
To listen to passages and questions, the student selects the [Speaker] [ |
|
Translations (Spanish stacked–dual language) |
In a Smarter Balanced for Mathematics or CAST assessment with the translations (Spanish stacked–dual language) designated support assigned, the student selects the [Cambiar de idioma] world [ |
|
Tutorial |
To view a short video demonstrating how to respond to a particular question type, the student selects Tutorial from the context menu. |
|
Word completion |
When the student types, a box follows the student’s typing and offers a list of single words providing an option for the next word. The student can continue typing or select or type a number to choose a word from the list. |
 ] icon next to the context menu. If only one ASL video is available, the video opens automatically.
 ] icon or [Down] down arrow [
 ] icon moves the closed-captioning box to the top or bottom of the testing area, and selecting the [Close] “X” [
 ] icon closes the closed-captioning box.
 ] icon below the global menu. To collapse the expanded passage section, the student selects the left arrow [
 ] icon in the upper-right corner.
 ] icon below the global menu. To collapse the expanded question section, the student selects the right arrow [
 ] icon in the upper-right corner to expand the passage to cover the entire screen.
 ] icon.
 ; and a [Mark for Review] flag and check mark [
 ] appears next to the number. The Questions toggle list that appears when selected displays a flag [
 ] for the selected question.
 ] icon appears next to the question number.
 ] icon appears next to the question number.
 ] icon in the formatting toolbar of the item response area to dictate responses to CR items. The dictated response is transcribed as text in the item response area.
 ] icon directly above this field for a response area or on the formatting toolbar for a CR response.
 ] button to toggle the content of the test item between English and Spanish.
Using Menus and Selected Tools
This section describes how to use the global and context menus to access on-screen tools. This section also provides further details for using some of the student testing application tools.
About the Global Menu
The global menu at the top of the test page contains navigation buttons on the left and tools on the right (refer to figure 3).

Figure 3. Global menu
To open a test tool in the global menu:
- The student selects the button for the tool. The selected test tool activates.
About the Context Menus
Each test question may include several elements, such as the question number and answer options (refer to figure 1). The context menu for each element (including the stimulus) only contains tools applicable to that element (figure 4).
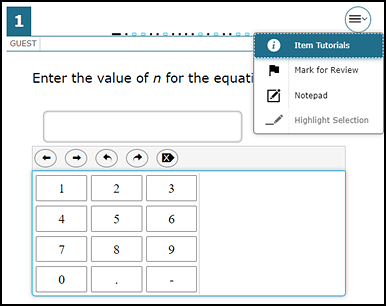
Figure 4. Context menu for a mathematics question (sample screen)
Opening a Context Menu for Passages and Questions
A student can access context menus by right-clicking elements or by selecting elements and then selecting the context menu button.
To access the context menu for a passage or question:
- The student selects the [Context Menu] parallel line [
 ] icon in the upper-right corner of the passage or question. The context menu opens.
 -
The student selects a tool to activate or open it. Figure 5 shows a context menu for a sample ELA item.
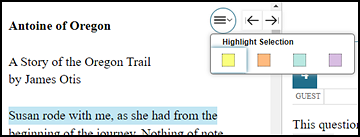
Figure 5. Context menu for ELA passage (sample screen)
Opening a Context Menu for Answer Options
A student can use the context menu to access tools for answer options in a multiple-choice or multiselect question.
To access an answer option’s context menu:
- To open the context menu, the student performs one of the following actions:
- If the student is using a two-button mouse, right-click an answer option.
- If the student is using a single-button mouse, select an answer option while pressing the [Ctrl] key.
- If the student is using a Chromebook, select an answer option while pressing the [Alt] key.
- If the student is using a tablet, tap the answer option and then tap the [Context Menu] icon; this selects the answer option until selecting a different option.
-
The student selects a tool from the context menu. Figure 6 shows a context menu for a sample ELA item.
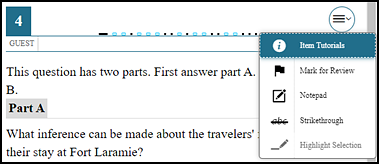
Figure 6. Context menu for ELA answer options (sample screen)
About the Toolstrip
A student who has the text-to-speech or ASL accommodations assigned can access these features on a toolstrip next to the context menu.
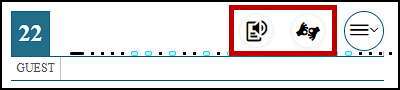
Figure 7. Toolstrip with the [Text-to-Speech] and [American Sign Language] buttons
About the Masking Tool
A student who has masking as a designated support can use the masking tool to hide sections of the test page the student finds distracting (figure 8).
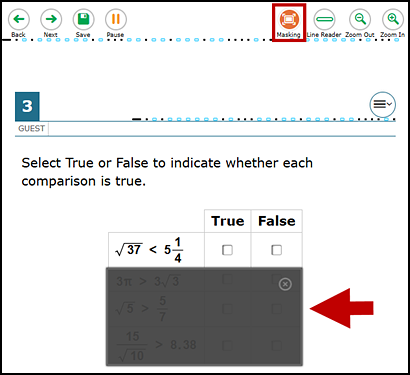
Figure 8. Test page with masked area (sample screen)
To mask an area of a test page:
- To activate the masking tool, the student selects [Masking] in the global menu. The button changes color and becomes orange.
- The student selects and drags across the distracting area of the test page using the mouse (desktop or laptop) or a finger (tablet).
- The student releases the mouse button or lifts a finger. The selected area becomes dark gray. The tool remains active until the student deactivates it.
To deactivate the masking tool:
- The student selects [Masking] in the global menu again. The button becomes green. Any masked area remains on the screen until the student removes it.
To remove a masked area from a test page:
- The student selects the [X] in the upper-right corner of a masked area. Note that this does not delete any masked content on the screen.
About the Line Reader Tool
A student moves an on-screen horizontal line that surrounds each line of text with shading after selecting the [Line Reader] line icon (indicated in figure 9). To move the line reader, the student selects (clicks) anywhere on the next line to be shaded.
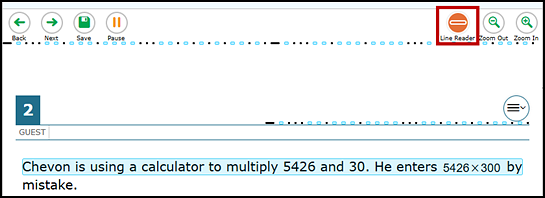
Figure 9. Line Reader (sample screen)
- This universal tool applies to both items and passages.
- Selecting an answer option with the line reader universal tool also will cause an option such as a radio button or checkbox to be selected.
- If the student selects the Option B radio button in a vertical list of answer options, selecting (clicking) Option B’s text will both shade the line of text in the line reader and select that answer option as the student’s response to the test question (figure 10). The student must select a line of text away from a radio button answer option—in a passage or the test question, for example—to unselect the selected line as the focus of the line reader universal tool. However, that answer option is still selected as the student’s response unless or until the student selects a different option.
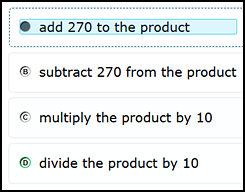
Figure 10. Line Reader with a radio button (sample screen)
-
For answer options with checkboxes, if the student selects the third option’s checkbox in a vertical list of answer options, selecting (clicking) the third option’s text will both shade the line of text in the line reader and select that answer option as one of the student’s responses to the test question (figure 11). The student must select a line of text away from a checkbox answer option—in a passage or the test question, for example—to unselect the selected line as the focus of the line reader universal tool. However, that answer option is still selected as one of the student’s responses unless or until the student selects the checkbox to unselect it.

Figure 11. Line Reader with a checkboxes (sample screen)
About Text-to-Speech
A student testing with text-to-speech can listen to passages, questions, answer options (figure 12), and responses in a response area, including to CR items (figure 13). Note the following about text-to-speech:
- Text-to-speech is only available for operational testing when using the secure browser and only when assigned as an embedded accommodation (Smarter Balanced for ELA and CSA reading passages) or designated support (mathematics, ELA, CAST, and CSA items).
- Text-to-speech with line tracking causes the entire line to be highlighted lightly. Each word that is spoken is highlighted in a contrasting color as it is read aloud.
- Any warning or advisory pop-up boxes can also be read aloud after a student selects the [TTS] speaker icon on the box.
- Text-to-speech in Spanish is available for the Smarter Balanced for Mathematics.
- Text-to-speech is only available for the practice tests in conjunction with a supported Chrome or Firefox web browser.
For information about configuring text-to-speech, refer to the Accessibility Guide.
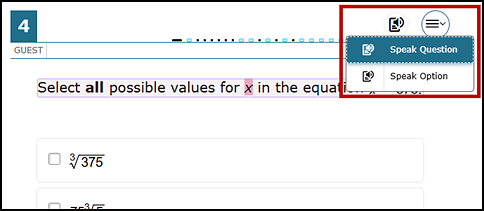
Figure 12. Speak tool options for questions (sample screen)
The following details apply for a student to listen to question content with the text-to-speech tool:
- To listen to a passage, a student selects the [TTS] speaker icon and selects a Speak option, either Speak Question (stimuli or passage), Speak Option (test question), or from both menu options. The student can also select a portion of text to listen to, such as a word or phrase. To do this, the student selects the text, selects the [TTS] icon, and selects Speak Selection.
- A student has a number of ways to listen to a question or answer options:
- To listen to the question and answer options, the student selects Speak Question from the [TTS] icon.
- To listen only to one answer option, the student selects the answer option and then selects Speak Option from the context menu. The student can also right-click the answer option and select Speak Option [#].
- To listen to all answer options, the student right-clicks before the first word in the first option and then selects Start Speaking From Here.
To listen to a written response, the student selects the [Speaker] icon to hear what has been entered into the response area (indicated in figure 13). If the student also has the embedded word completion accommodation assigned, the TDS will read the options in the pop-up list when the students hovers the mouse pointer over it or presses a number key associated with the response.

Figure 13. [Speaker] icon in a constructed response (sample screen)
Figure 14 shows the menu that appears when a student selects the [Test Settings] icon. The student can adjust the volume, pitch, rate, and TTS tracking while testing.
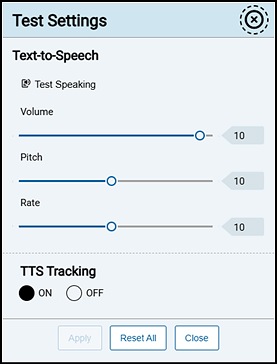
Figure 14. Text-to-speech settings
About Speech-to-Text
The speech-to-text tool allows a student to dictate responses to items that support the use of speech-to-text. The student’s spoken words are then transcribed as text in the item response area (refer to figure 15).
For information about configuring speech-to-text, refer to the Accessibility Guide.
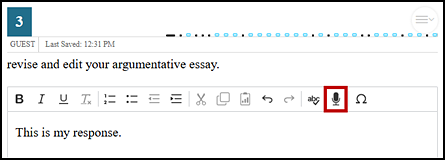
Figure 15. Speech-to-text response
To begin dictating, the student selects the [Microphone] [ ] icon that is displayed at the top of the item’s text response area. Note the following about the student’s use of speech-to-text:
- The formatting toolbar scrolls along with the page and remains visible while the item is in focus.
- As the student speaks, the words are transcribed into the text response area. However, there may be a slight delay while the text is being transcribed and dots appear in the text response area to indicate that the transcription is in process.
- The student can dictate for five minutes at a time.
- The entered text may be auto punctuated. The student can also control the punctuation and grammar of the text through speech commands to some extent. For example, the student can say, “New Paragraph” to create a new paragraph.
- It is ultimately the student’s responsibility to ensure the accuracy of the transcription as well as grammar and punctuation.
- The student selects the [Microphone] icon to stop dictating.
About Word Completion
When this resource is turned on, options appear in a box that is near or under the response the student is entering (figure 16). When the options appear, the student can either select a word from the list or type the number of the predicted word to apply it to the response.
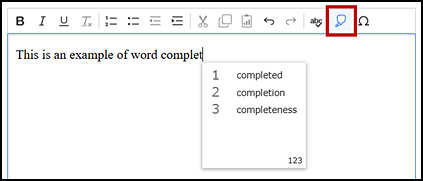
Figure 16. Example word completion
Constructed-Response Text Response Formatting Toolbar
In addition to the standard test tools described in the subsection Test Tools, a student can use a formatting toolbar for part 2 of the ELA PT and the CSA CR writing item above the response field for text response questions (refer to figure 17). The formatting toolbar allows the student to apply styling to text and use standard word-processing features.

Figure 17. Text response question with formatting toolbar (sample screen)
Table 3 provides an overview of the formatting tools available.
| Tool | Description of Function |
|---|---|
|
|
Bold, italicize, or underline selected text |
|
|
Remove formatting that was applied to the selected text |
|
|
Insert a numbered or bulleted list |
|
|
Decrease indent of text |
|
|
Indent a line of selected text |
|
|
Cut selected text |
|
|
Copy selected text |
|
|
Paste copied or cut text |
|
|
Undo the last edit to text or formatting in the response field |
|
|
Redo the last undo action |
|
|
Use spell check to identify potentially misspelled words in the response field |
|
|
Add a special character in the response field |


Spell Check
The spell check tool identifies words in the response field that may be misspelled.
To use spell check:
- In the toolbar, the student selects the [Spell Check] a-b-c [
 ] icon. Potentially incorrect words change color and become underlined.
 - To exit spell check, the student selects the [Spell Check] a-b-c [] icon again.
Special Characters
A student can add mathematical characters, accented characters, and other symbols to responses that use the formatting tools.
To add a special character:
- In the toolbar, the student selects the [Special Characters] omega [
 ] icon.
 -
In the window that pops up, the student first selects the category of special characters from the Category drop-down list—either All, Currency, Mathematical, or Text—and then selects the required character (refer to figure 18).
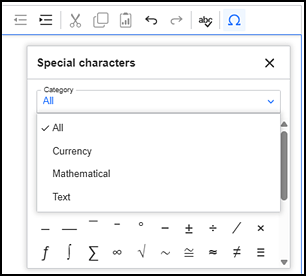
Figure 18. Special characters window
In the CSA, only the special characters used in Spanish writing, such as ñ or ¿, appear (figure 19).
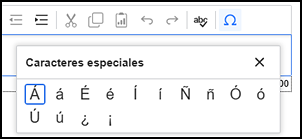
Figure 19. Caracteres especiales window for the CSA
Keyboard Navigation for Students
A student can use keyboard commands to navigate between test elements, features, and tools.
Sign-In Pages and In-Test Pop-Ups
Table 4 lists keyboard commands for selecting options on the sign-in screens or pop-up windows that appear during an assessment.
| Function | Keyboard Command |
|---|---|
|
Move to the next option |
[Tab] |
|
Move to the previous option |
[Shift] + [Tab] |
|
Select the active option |
[Enter] |
|
Mark checkbox |
[Space bar] |
|
Scroll through drop-down list options |
Arrow keys |
|
Close pop-up window |
[Esc] |
Keyboard Commands for Test Navigation
Table 5 lists keyboard commands for navigating assessments and responding to questions.
| Function | Keyboard Command |
|---|---|
|
Scroll up |
[↑] (up arrow) |
|
Scroll down |
[↓] (down arrow) |
|
Scroll to the right |
[→] (right arrow) |
|
Scroll to the left |
[←] (left arrow) |
|
Move to the next element |
[Tab] |
|
Move to the previous element |
[Shift] + [Tab] |
|
Select an answer option |
[Space bar] or [Enter] |
|
Go to the next test page |
[Ctrl] + [→] (right arrow) |
|
Go to the previous test page |
[Ctrl] + [←] (left arrow) |
|
Open the global menu |
[Ctrl] + [G] |
|
Open a context menu |
[Ctrl] + [M] |
Keyboard Commands for Global and Context Menus
A student can use keyboard commands to access tools in the global and context menus. For more information about tools, refer to table 1.
Global Menu
Table 6 lists keyboard commands for accessing the global menu tools.
| Function | Keyboard Command |
|---|---|
|
Open the global menu |
[Ctrl] + [G] |
|
Move between options in the global menu |
Up or down arrow key |
|
Select an option |
[Enter] |
|
Close the global menu without selecting an option |
[Esc] |
Context Menus
Table 7 lists keyboard commands for accessing the context menus.
| Function | Keyboard Command |
|---|---|
|
Navigate to an element (question, answer option, stimulus) |
[Tab] |
|
Navigate in reverse |
[Shift] + [Tab] |
|
Open the context menu for the selected element |
[Ctrl] + [M] |
|
Move between options in the context menu |
Up or down arrow key |
|
Select an option |
[Enter] |
|
Close the context menu without selecting an option |
[Esc] |
To select text and open context menu options, the student first navigates to the element containing the text to be selected and then takes the following steps:
- The student presses [Ctrl] + [M] to open the context menu.
- If multiple options are available, the student uses the arrow keys to navigate to [Enable Text Selection].
- The student presses [Enter]. A flashing cursor appears at the upper-left corner of the active element.
- To move the cursor to the beginning of the text the student wants to select, the student uses the arrow keys.
- The student presses [Shift] and an arrow key to select text. The text the student selects appears shaded.
- The student presses [Ctrl] + [M] again and then chooses the tool to use for the selected text, for example, Highlight Selection.
Keyboard Commands for Grid Questions
Technology-enhanced questions with the grid response area (figure 20) may have up to three main sections:
- Answer Space: This is the grid area where a student enters the response.
- Button Row: Action buttons may appear above the answer space. Buttons may include [Delete], [Add Point], [Add Arrow], [Add Line], [Add Circle], [Add Dashed Line], and [Connect Line].
-
Object Bank: This is a panel containing objects a student can move to the answer space.
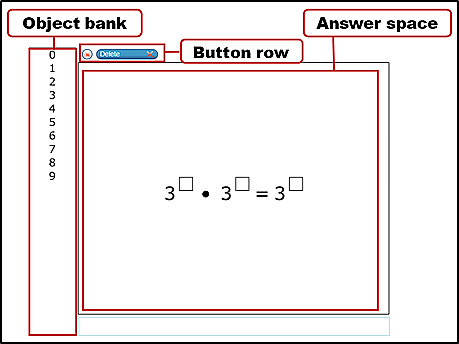
Figure 20. Grid question
To move between the main sections:
- To move clockwise, the student presses [Tab].
- To move counterclockwise, the student presses [Shift] + [Tab].
To add an object to the answer space:
- With the object bank active, the student uses the arrow keys to move between objects. The active object has a blue background.
- To add the active object to the answer space, the student presses [space bar].
To use the action buttons:
- With the button row active, the student uses the left and right arrow keys to move between the buttons. The active button is white.
- To select a button, the student presses [Enter].
- The student presses [space bar] to apply the point, arrow, or line to the answer space.
To move objects and graph elements in the answer space:
- With the answer space active, the student presses [Enter] to move between the objects.
- The student presses [space bar]. The active object displays a blue border.
- The student presses an arrow key to move the object. To move the object in smaller increments, the student holds [Shift] while pressing an arrow key.
Keyboard Commands for Equation Questions
Equation questions allow a student to use keyboard commands to open a menu listing the special characters the student can insert into the response area.
To insert special characters in the response area:
- With the focus in the text field of the response area, the student presses [Alt] + [7]. The Special Characters window opens.
- To move between options in the context menu, the student uses the [Up] or [Down] arrow key.
- To add the selected option to the response area, the student presses [Enter].